Deploy Print Scouts
After installing the first Print Scout, you can now deploy Print Scout to user workstations.
- Each workstation and print server needs a Print Scout installed to collect information about print jobs. (requires Print Analytics license)
- Each workstation needs a Print Scout installed to enable Secure Release. Secure Release will remain inactive until activated by the user. (requires Secure Release license)
- Each workstation needs a Print Scout installed to enable Direct Print (requires Direct Print license).
Deploying Windows Print Scout
The Windows Print Scout is typically distributed using an automated software installation utility, such as Microsoft Systems Management Server (SMS).
You can always click the View Deployment Instructions in the Setup Guide to view these steps.
To distribute the Print Scout to multiple machines:
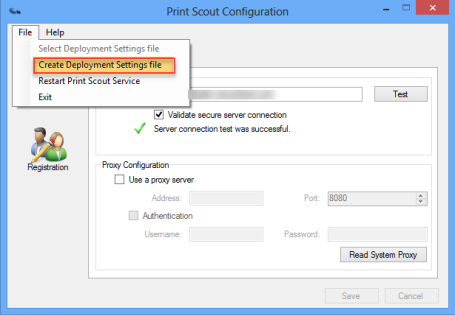
- On the machine where you installed the first Print Scout, create the deployment settings file.
- Open the Print Scout Configuration tool (Configuration.exe) from the install directory
- Click the File menu and then select Create Deployment Settings file.
- Open the Print Scout Configuration tool (Configuration.exe) from the install directory
- Locate the deployment files created in Step 1 from
- PrintScoutInstaller.exe - This is the repackaged Print Scout installer used for mass deployment.
- InstallConfig.ini - This file contains Print Scout configuration settings and customer registration information. It should be copied to all machines on which the Print Scout will be installed. This enables registration of a group of Print Scouts to the Pharos Cloud.
- Distribute these two files to a directory on the target workstation.
- Execute PrintScoutInstaller.exe /silent on the machine, either locally or from a remote location accessible to the machine.
Note: The account running the Print Scout installer requires administrator rights on the machine on which it is installed.
- Follow the on-screen instructions to complete the installation. NOTE: To run a silent install, the InstallConfig.ini file from Step 1 must be in the same directory as the PrintScoutInstaller.exe file.
- Verify Print Scout installation. The Secure > Print Scout screen displays details about the individual machines on which a Print Scout has been installed. A successful installation is indicated by an "OK" status under the "Scout State" column.
Note: The account running the Print Scout installer requires administrator rights on the machine on which it is installed.
After Windows Print Scout installation (Secure Release)
- A print queue named Pharos Secure Printer is automatically installed on user workstations. This queue uses HP Universal Printing PCL 6 and is configured to capture printing sent via the port monitor.
- The Pharos Secure Release Setup Guide is also installed on user workstations. This wizard guides users through activating Pharos Secure Release on their workstation and mobile device.
-
The following Windows Services are installed on user workstations:
- Pharos Print Scout Service - provides print tracking and related features.
- Pharos Print Scout Spooler Service - provides Secure Release printing services.
- The Pharos Secure Release desktop app is installed. This allows users manage their documents from the desktop. For example, users can view or delete their documents from their desktop before walking up to a Secure Printer.
After Windows Print Scout installation (Direct Print)
- The Pharos Secure Release desktop app is installed. This allows users to add printers for use with Direct Print.
Deploying Mac Print Scout
The Mac Print Scout is typically distributed using silent installation. With silent installation, the complete installation, configuration and registration steps are eliminated. To silently install additional Mac Print Scouts, you will first create a deployment image. By sharing and using this deployment image, others will be able to silently install a Mac Print Scout on their Mac workstation. For example, similar to the Print Scout used for Windows, your organization's IT administrator can perform a mass deployment by pushing the package to the organization's Mac workstations where the Mac Print Scout will be automatically installed.
Note: If you use a proxy server to communicate to the outside world, you will need to enter the appropriate proxy server information first (in the Print Scout Configuration tool) before following the steps below.
To distribute the Mac Print Scout to multiple machines:
-
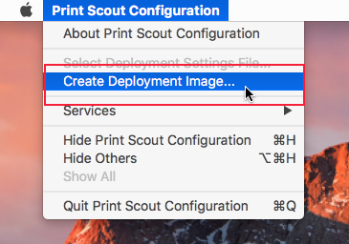
On the machine on which you installed the first Mac Print Scout, create the deployment image. This image is created once and shared with others in your organization.
-
Open the Print Scout Configuration tool from the directory /Library/Application Support/Pharos/PrintScout.
- With the Mac Print Scout Configuration dialog active, open the menu and select Create Deployment Image.
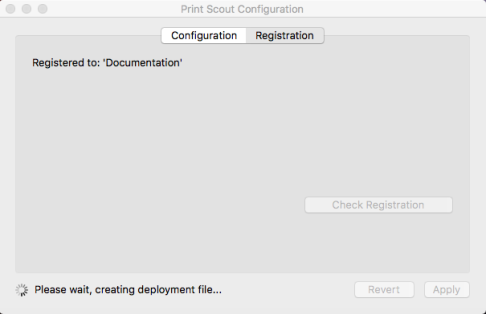
- Click Save to create a deployment image. By default, the deployment image is saved to either the Desktop or the last used folder.
Note: You can save the deployment image to any location, but avoid saving it to this path /Library/Application Support/Pharos/PrintScout/AppData/Deployment. You will get a 'Permission denied' error and the deployment image will not be created.
-
You will see a progress indicator at the bottom of the Print Scout Configuration dialog box. When the process completes, you will see a .dmg file (disk image) in the specified folder.
-
-
Copy and open the deployment image on target Mac workstations. The deployment image includes two files:
- MacPrintScoutInstaller.pkg - This is the repackaged Mac Print Scout installer used for mass deployment.
- InstallConfig.ini - This file contains the Mac Print Scout configuration settings and customer registration information. This enables automatic registration of Mac Print Scouts to Secure Release.
-
Using the Terminal application, run the following command to silently install the Mac Print Scout.
Note: To access the Terminal application, first open your Applications folder, then open your Utilities folder where the Terminal application resides. You may also bring up the Terminal application by using the Spotlight tool in the upper right-hand corner.
sudo -S SILENT_INSTALL=1 /usr/sbin/installer -tgt / -pkg <path>/MacPrintScoutInstaller.pkg
Example: sudo -S SILENT_INSTALL=1 /usr/sbin/installer -tgt / -pkg /Volumes/Mac\ PrintScout\ 2.3.0.2330/MacPrintScoutInstaller.pkg
Note: "<path>" represents the location path of the Mac Print Scout installer. Your Mac Print Scout Installer version may be different than what is shown in the example above.
-
Verify Print Scout Installation. The Secure > Print Scout screen displays details about the individual machines on which a Print Scout has been installed. A successful installation is indicated by an "OK" status under the "Scout State" column.
After Mac Print Scout installation (Secure Release)
- A print queue named Pharos Secure Printer is automatically installed on user workstations. :
- The Pharos Secure Release Setup Guide is also installed on user workstations. This wizard guides users through activating Secure Print on their workstation and mobile device.
-
The following services are installed:
- SpoolerServiceMac - Provides Secure Release printing services.
- PrintScout - Provides print tracking and related features.
- The Pharos Secure Release desktop app is installed. This application allows users to view or delete their jobs from their workstation before they walk up to a Secure Printer.
After Mac Print Scout installation (Direct Print only license)
The Pharos Secure Release desktop app is installed. This allows users to add printers for use with Direct Print.